
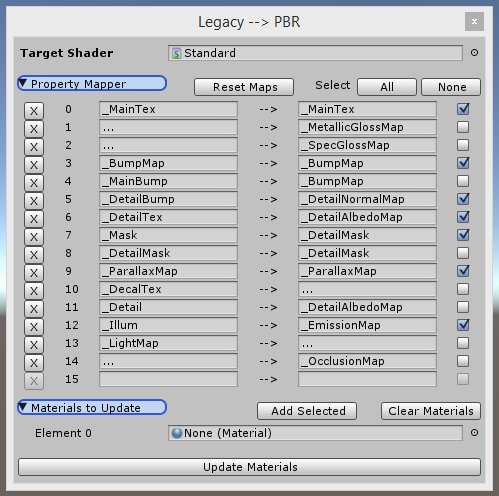
Legacy 2 PBR – a batch Material updater for Unity 5
Posted: July 1, 2015 Filed under: Asset Store | Tags: AssetStore, c#, code, editor extension, PBR Shaders, unity3D 1 CommentHey everybody! I just want to take a quick minute to share a cool Unity extension I made that you may find useful for your projects. It’s called Legacy 2 PBR, and its primary function is to automate your Material update process when moving from Unity 4 to Unity 5.
Legacy 2 PBR – https://www.assetstore.unity3d.com/en/#!/content/39625
NavMesh and Mecanim
Posted: December 9, 2014 Filed under: 3D Animation | Tags: 3d animation, c#, gamedev, navmesh, unity3D 5 CommentsI talk with a lot people about Mecanim, and I find that one of the most common difficulties with the tool is getting it to work with other systems within Unity. It’s not that Mecanim can’t link up with those systems, but more that it isn’t always obvious how to put the two together. One of the most frequent problems I run across tends to be using the NavMesh and Mecanim together.

Cutscenes with Mecanim
Posted: November 19, 2014 Filed under: 3D Animation, Videos | Tags: c#, character animation, cutscenes, humanoid, mecanim, mecwarriors, unity3D Leave a commentWarriors! I have for you a brand new video tutorial on how to make cutscenes running with Mecanim! This is the longest video on our site yet, clocking in about 1 hour, so I recommend making sure you have the time to sit it out. As usual, if you have any questions for me just jump in and leave me a comment down below. As usual, here’s a Unity package file for you to download if you’d like to work along with the video.
Github repo (all projects): The MecWarriors Github
I look forward to hearing from everyone. Happy coding!
Scripting Root Motion
Posted: August 18, 2014 Filed under: 3D Animation | Tags: animation, c#, character animation, csharp, game dev, humanoid, mecanim, mecwarriors, tutorial, unity3D 9 CommentsHey, Warriors! It’s Adam here again, and today I’m going to show you how to set up a root motion animation system in your code.

Me when I think I know something cool.
In previous posts where I’ve gone over the fundamentals of setting up humanoid animation systems, I focused on creating character motion using both the standard Third Person Controller script and the root motion option in the Animator component.
As you may have discovered in those posts, these systems definitely have a few flaws that make them a little hard to work with at times. The TPC script is quite old and isn’t really meant to work with Mecanim which causes various headaches, and relying on root motion to determine your character’s movement means including unnecessary animation work early on in your development schedules. You can’t truly test a root motion-based movement system without some animations set up to make it work, and this means focusing on animation during your prototyping phases, which may not be a good option.
But fear not, Warriors! There is yet another way to control the awesome power that is Mecanim, and by the end of this post you’ll be using your home-brewed character controllers to control some of the more negative aspects that come with using a root motion system to move your characters around. Grab the example package, and let’s get on our way!
 [Scripting_RootMotion]
Read the rest of this entry »
Guest Post: Brian Block, Rigging a Character for Audio with Mecanim
Posted: April 15, 2014 Filed under: 3D Animation, Audio, Guest Posts, Videos | Tags: audio, c#, game dev, game sound, mecanim, mecwarriors, sound design, unity3D, video, video tutorial 1 CommentHi Warriors! It’s time to learn about sound! Today I have a special guest post from sound designer Brian Block on how to set up audio cues in your animations using Mecanim. Brian has made a fantastic hands-on video for you all, so be sure to download the package below if you want to follow along. Have fun!
Guest_BrianBlock_RiggingForAudio

Brian Block is a sound designer and composer living in Chicago, IL. While proficient in audio production, Brian’s specialty is video game audio implementation. He works with middleware tools like Wwise and FMOD to incorporate game audio in unique and interactive ways. Previously, Brian served as the Audio Lead for the Undertakers game project (related: MecWarriors @ GDC). More of his work can be found here: http://www.brianalanblock.com
2D Animation, Part 4 – Code Explanation
Posted: April 2, 2014 Filed under: 2D Animation, Guest Posts | Tags: 2d animation, animation, c#, character animation, code, csharp, game dev, mecanim, scripting, unity2d Leave a commentPreviously on the site we hosted a guest series on 2D animation in Mecanim written by game artist Jonathan Ferriter. In Part 3 of the series, Jon showed us how take our 2D animations and implement them in the Unity engine using the two scripts provided in the post and titled Jump.cs and Move.cs.
In that third video, Jon sort of skims through the makeup of these scripts and doesn’t take the time to explain how they actually work, so I wanted to write this post in order to discuss them further. While writing this post I’ve gone through both scripts, learned how they work, and written comments in them so you might better understand their systems. You can download the updated scripts from this link.
Guest_JonFerriter_2DAnimation
Read the rest of this entry »
Blend Trees: 1-D Blending
Posted: January 29, 2014 Filed under: 3D Animation | Tags: animator controller, blend, blend tree, c#, code, humanoid, mecanim, mecwarriors, scripting, unity3D 4 Comments“A common task in game animation is to blend between two or more similar motions. Perhaps the best known example is the blending of walking and running animation according to the character’s speed.”
— Unity Docs
What Is A Blend Tree?
A blend tree is a special type of animation node in Mecanim that allows multiple different animation clips to be played at the same time so that an animated object can shift between different motions. It allows us to maintain a smoothed state of motion in situations where a quick animation swap would otherwise appear jerky and visually inconsistent.
This smoothed motion is created when a blend tree takes a percentage of each animation involved in the blend and combines them into a single unique motion. The percentage of each animation that a blend tree uses in a blend is controlled by one or more parameters set in our Animator Controller. As the values of these parameters change, the percentage of each animation used in a blend is adjusted in real time.
In this post I want to show you how to set up a few basic blend trees of your own and discuss some situations where blend trees can really help out in your Mecanim development. Let’s go, Warriors!
Read the rest of this entry »
Humanoid Animation – Free [Root] Motion
Posted: November 22, 2013 Filed under: 3D Animation | Tags: animations, Apply Root Motion, c#, mecanim, mecwarriors, root motion, unity3D 10 CommentsHey all you cats and chicks out there! It’s time for another Mecanim session, and in this post we’ll be dealing with the basics of Root Motion.
I’ve already shown you how to use Unity’s Third Person Controller script to move a player around in the game world, but that is only one of the methods of player movement available to us when using Mecanim for character animation. Root Motion is a feature new to Unity 4.x that came with Mecanim, and it can be quite powerful if you know how to use it.
Series Goals:
- Set up a rigged character and some animations in Unity
- Build a custom movement script from scratch
- Construct an animator controller for our character that utilizes Root Motion
The end result of my previous Free Motion series was a functioning Free Motion player movement system that played three different character animations: an idle, a walk forward, and a run forward. The player character moved in a Free Motion style, which means it moved in a forward direction no matter which way it was moving relative to the camera. Here are the results from the previous series:
In this new series we’re going to accomplish the same goal using Root Motion, so we’re going to have to approach our objective in a completely different way.
Read the rest of this entry »
Humanoid Animation – Free Motion, Part 2: Modifying the Third Person Controller
Posted: October 28, 2013 Filed under: 3D Animation | Tags: animation, c#, csharp, mecanim, scripting, unity3D 17 CommentsWelcome back, Warriors! This is the second installment of my tutorial on building a free motion animation system using Mecanim. In this post I’m going to walk you through the steps for modifying the Third Person Controller (TPC) script that comes as a part of Unity’s Standard Assets so that it works with Mecanim.
If you haven’t read Part 1: Importing Assets, be sure to check that out before reading on. You’ll need the tutorial package from that post to continue working.
I mentioned this briefly in the first post, but I want to remind you why I’m showing you how to use the TPC script in this tutorial. Even if I’m not a huge fan of it, plenty of developers still use it in their project because it is immediately available to everyone as a part of Unity’s Standard Assets packages. It’s also pretty easy to use if you don’t have the time or know-how to write your own movement code. Unfortunately, the script is written with Unity’s Legacy animation system in mind and not Mecanim. This can cause a lot of problems during development, especially later on when you can’t change fundamental game systems like player movement.
Since I’ve been in this difficult position before, I intend to show you all a way to continue using the TPC script for player movement while using Mecanim for character animations. In order to merge the two systems, we’ll need to make some modifications to our TPC script. All of the modifications shown here deal only with our animation code. No other parts of the code are disturbed.

